Posts

Final 3D digital

Image
This is my final 3D digital, I believe it was successfull as was able to get the effect of the sea running vertical with out any part of the sky repeating.  To add to it I could add the same effect upwards along the left side to make it similar to the original photo. To do this I followed a step by step tutorial on YouTube and found it extremely help full.  Before moving any pictures I first edited them in order to get a blue sky by changing the vibrance of the colours, and a sharp moon where you can see all the details.  ISO 100, Aperture 1/600, Shutter speed f/ 5.6 ISO 400, Aperture 1/ 280, Shutter speed f/ 280 To start I removed the rocks, and deleted part of the sea where the direction changes.  I added a part of the sky in the background to make it look as if its always been there. After I copied part of the sea and cut it diagonally to create the waterfall effect. Finally i added ...

Final Anolog

Image
For my final piece I chose to do another linticullar structure as i enjoyed it most. I wanted to use the same theme as before of having contrasting images. I used a photo of the sea I took along with a picture of a flower to represent land. I chose to show these pictures together as it shows two seprate parts of the world, and how they don't collide together. This was extremely challenging as I had to make sure all the measurements we all exactly the same. After I printed the 2 photos on a3 glossy printing paper, and used the rotary cutter to slice them. I had to stick two pieces of a3 card together that I folded into the fan shape to be able to fit each piece on.  ISO 100, Aperture 1/100 Shutter Speed f/3.6 ISO 100, Aperture 1/600, Shutter speed f/ 5.6

3D Analog practice

Image
I tried two different types of analog as I wasn't sure which one I wanted to do. I started with scalping parts,  using a scalpeland mat out of a high key photo I took in the studio. This reveled a photo behind it that i found on the internet. In one you can see the sun behind and in the ther you cant. This was to represent her emotions. By not showing the sun and the position of the cuts it changed the mood of the photos drastically. For my second one I chose to do a linticullar structure. I did a practice one and both pictures were images I found on the internet. I wanted to present a contrast so on one side shows a sunset, and the other showed a storm, again this could represent emotions. For my practice I used Photoshop to measure the photo slices, but I took parts of the photo out and replaced them with another, which is why I believe it was unsuccessful.

3D Digital

Image
This is the photo  am choosing to recreate for my 3d digital photography. However, I am going to use photos I took, one of the sea and replace the boat with a picture of the moon I took. I chose this image as it challenged my knowledge of photoshop and allowed me to learn new skills. I also enjoyed it's abnormal aesthetic.    

Lenticular

Image
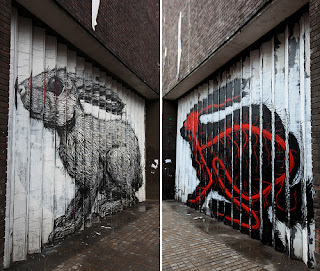
Lenticular artwork is a printed photograph or painting placed on a rippled surface in a certain way that depending on the angle the image will shift from one thing to another, sometimes making an animated effect.  ROA ROA is a graffiti and street artist from Ghent Belgium born in 1976. He has put his work all over Europe, United States, Australia, Asia, New Zealand and Africa. He usually paints wild animals native to the area. He uses mainly simple colours such as black and white, but also uses splashes of bright vibrant colours to show the veins within the animal. A latticed warehouse door in London provides the perfect setting for lenticular graffiti. The rabbit by the artist  Roa, from one angle you can see a realistic grey rabbit, and from the other you get a black  silhouette with the rabbit’s veins and arteries showing in bright red. Roa had a show for his lenticular work at Brooklyn’s Factory Fresh. The wor...

3D Analogue and Digital Photography

Image
3D Analogue Photography These photos have been taken as a portrait and when printed out they have been scalped in certain places to revel another photo in the background. as well as having things placed on top such as card or leaves. I believe this allows people to see the subject's true emotions and brings them to the surface.  3D Digital Photography  These photos are 2D images that have been Photoshopped to look 3D. In order to create the effect that water or cows head is comming out of the frame. I enjoy this as it adds to a boring picture of the sea or a cow and makes people intrigued and want to know more. 

Danielle Guenther

Image
Danielle Guenther was born in Ohio and moved to New York as she felt it has a busy nature and would provide good photographs.   Guenther is a self taught photographer who says she views "the world through a child's perspective." She is also a mother who is inspired by the energy of her children as they have such "power, enthusiasm, and emotion." She allows every moment to reveal itself through the lens in an authentic or funny way. Guenther believes it's important to capture families in their everyday life, because  after starting a family, your life seems to pick up speed forever. She uses natural light, so it will take time to decide the best lighting in the home or outdoors. "Rush Hour" "Parenting is exhausting" "Check, please!" Guenther believes that "If you can evoke emotion in a photograph, I feel the memory will live on forever." "Hold on a sec" The title of ...

Kaleidoscope

Image
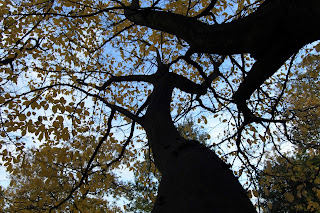
In this lesson I went around the college campus and photographed trees, the aim was to find one that would make a good kaleidoscope.  Once I did this I opened the picture in photoshop where I started by making one copy of the layer. From there I aligned it so it fit next to the first image and flip it horizontally. I then merged them two and copied the whole layer again and flipped it vertically and just continued doing that over and over increasing  the page size each time. 

Fay Godwin

Image
Fay Godwin was born on the 17th February 1931 and died on the 27th May 2005. She was a British photographer known for her black and white landscapes of the British countryside and coast, she was also extremely interested in literature and produced portraits of well-known writers, photographing almost every significant literary figure in 1970s and 1980s England, as well visiting foreign authors. While she was out taking photos she would often stay in one spot that she had found that was good enough for taking photos that would and would spend up to two hours there taking a single pictures every time there was a minor shift in light. She would also return again and agin to one spot that she thought would be a great picture once a certain type of light was around. In one of her books Godwin said “Twelve pictures, all identical to look at, and I can’t imagine how I could have thought it necessary to do twelve unit I print, and then the differences begin to emerge”. Godwin also set her...

Evaluating Someone Else's Work

Image
You are going to look at another person's work 1.Firstly use 5 words to describe that work Close up shot Natural form  Shallow depth of field  Peaceful Icy 2. Now comment on the images form This means looking at the formal elements of an artwork. What is the medium of the work? To take this picture the photographer told me she laid down on the floor and zoom in and manually focused the lens. What kind of shapes or forms can you find? There are a lot of jagged edges and round shapes. There is also a couple of curled leaves. Which techniques have they used? She used a low aperture to get the background blurred out. What kinds of textures can you see? There are rough textures in the bigger dead leaves but a smoothed out edges on the smaller green leaves. 3. Finally consider the mood and meaning of the work Mood means looking at how the artist has created a certain atmosphere or feeling. How does the work make you f...

Blur tools

Image
Motion Blur For this exercise the aim was to make a sharp moving image look as if it was moving so fast the picture came out blurry. To do this we started out by making a copy of the original image on photoshop and on that layer making a mask so I could edit on that picture without actually effecting the original image. I then selected the motion blur tool and adjusted the settings to choose how blurry I wanted it to be, once I did this I used the rubber tool to erase the part of the layer where i wanted the blur to come through.      Lens Blur For this exercise the aim was to blur out the whole picture leaving one strip sharp. To do this it was the same concept as motion blur where i made another copy and edited on it only this time i use a tool called quick mask, when selected it allowed me to see the changes in a red line and when deselected it blurred out everything but the red strip. I then edited the picture by changing the exposure...

Order and Chaos Research In Library

Image
This is extra research we did using books from the library, this was to show that I extended my research from just the internet. Andreas Gursky is a German photographer he is known for his large format architecture and landscape colour photographs, often employing a high point of view. Gerry Badger Badger is an English photographer and writer about photography. This was a book he wrote on "The Genius o Photography". The book explores the key events and the key images that have marked the development of photography. Nick Knight  Knight is a British photographer who has many books one being Flora, the book reveals 46 of the most striking specimens, providing the first ever photos of the collection.